> For the complete documentation index, see [llms.txt](https://docs.abtasty.com/llms.txt). Markdown versions of documentation pages are available by appending `.md` to page URLs; this page is available as [Markdown](https://docs.abtasty.com/integrations/other-integrations/data-warehouse/snowflake---daily-exports-from-ab-tasty-to-snowflake.md).
# Snowflake - Daily exports from AB Tasty to Snowflake
Snowflake is a cloud data warehouse that can store and analyze all your data records in one place. It can automatically scale up/down its compute resources to load, integrate, and analyze data.
## The connector
### Step 1: Create the worksheet
From your SnowFlake console, execute the following steps:
1. Create a SnowFlake account
2. Go into your account to create a new SQL [Snowflake worksheet](https://docs.snowflake.com/en/user-guide/ui-worksheet.html)
3. Copy this below code (change the annotation field as role, username, password etc ..)
```
-- set variables (these need to be uppercase)
set abt_snwoflake_role = 'YOUR_ROLE'; // field to be defined by you
set abt_snowflake_username = 'YOUR_USER_NAME'; // field to be defined by you
set abt_snowflake_warehouse = 'YOUR_WAREHOUSE';// field to be defined by you
set abt_snowflake_database = 'YOUR_DATABASE';// field to be defined by you
set abt_snowflake_schema = 'YOUR_SCHEMA'; // field to be defined by you
-- set user password
set airbyte_password = 'your_password'; // field to be defined by you
begin;
-- create your role
use role securityadmin;
create role if not exists identifier($abt_snwoflake_role);
grant role identifier($abt_snwoflake_role) to role SYSADMIN;
-- create your user
create user if not exists identifier($abt_snowflake_username)
password = $airbyte_password
default_role = $abt_snwoflake_role
default_warehouse = $abt_snowflake_warehouse;
grant role identifier($abt_snwoflake_role) to user identifier($abt_snowflake_username);
-- change role to sysadmin for warehouse / database steps
use role sysadmin;
-- create your warehouse
create warehouse if not exists identifier($abt_snowflake_warehouse)
warehouse_size = xsmall
warehouse_type = standard
auto_suspend = 60
auto_resume = true
initially_suspended = true;
-- create your database
create database if not exists identifier($abt_snowflake_database);
-- grant your warehouse access
grant USAGE
on warehouse identifier($abt_snowflake_warehouse)
to role identifier($abt_snwoflake_role);
-- grant your database access
grant OWNERSHIP
on database identifier($abt_snowflake_database)
to role identifier($abt_snwoflake_role);
commit;
begin;
USE DATABASE identifier($abt_snowflake_database);
-- create schema for Airbyte data
CREATE SCHEMA IF NOT EXISTS identifier($abt_snowflake_schema);
commit;
begin;
-- grant Airbyte schema access
grant OWNERSHIP
on schema identifier($abt_snowflake_schema)
to role identifier($abt_snwoflake_role);
commit;
```
4. Paste it inside the console and run it
5. Once the script is done, refresh the page. On the left part, a new line will appear with the name you gave inside the script for the Data Warehouse
```
set abt_snowflake_database = 'YOUR_DATABASE';// field to be defined by you
```
In the above example, the name of the worksheet is YOUR\_DATABASE
### Step 2: Get SnowFlake Host
On the Snowflake homepage, click at the bottom left of the page and copy the account URL
{% hint style="info" %}
#### If you want to use the authentication method with login + password, you don’t need to do more. Otherwise, if you want to use public Key and secret key, follow these steps
{% endhint %}
### Step 3: Set up the connector
1. Go to the integration page > Data Warehouse > Snowflake > setup connector
2. Enter a name for the collector
3. Host: This corresponds to the account URL you’ve already copied
4. Role: the role we created in the previous script
5. Warehouse: the warehouse we created in the previous script
6. Data Warehouse: the Data Warehouse we created in the previous script
7. Authorization method: choose username and password
1. Username: the username we created in the previous script
2. Password: the password we created in the previous script
8. Loading Method: choose internal staging
You will get an error message if one of the fields contains an error.\
Your connector is now set up, and you can go ahead and **set up your Export**.
## The export
To set up your daily export, please take a look at the guide: [Data Warehouse integrations: General information](/integrations/other-integrations/data-warehouse/data-warehouse-integrations-general-information.md).
### Step 1: Generate your payload
Use the [Data Warehouse](/integrations/other-integrations/data-warehouse/data-warehouse-integrations-general-information.md) article to create your payload.
### Step 2: Set up the export
1. Export name: the name of your export; give an explicit name to retrieve it easily in AB Tasty
2. Name of the table: the name of the table we will create in your Snowflake
3. Data exporter query: paste here the payload of your data explorer query
4. Click save and create.
The SnowFlake integration is now complete, and you will soon see the data flowing into your dedicated Data Warehouse (It can take up to 2–3 hours, depending on the size of your report).
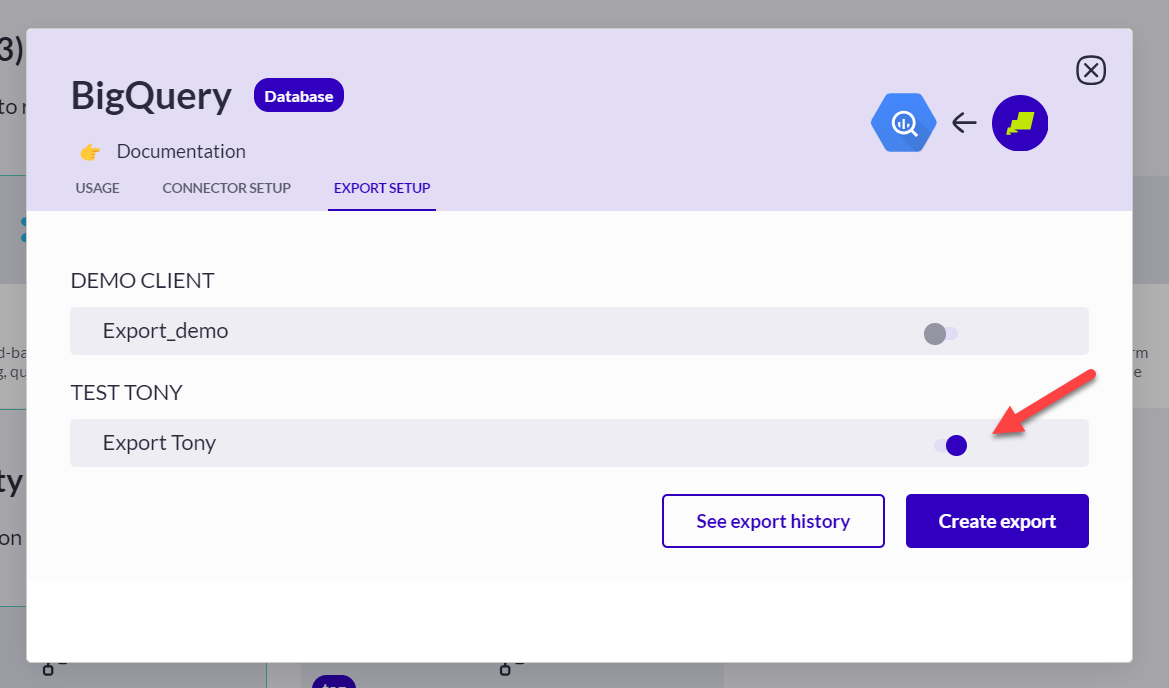
The export is activated upon creation, and new data will be appended to the current one, daily. The following screenshot shows that the export is activated on creation:
---
# Agent Instructions
This documentation is published with GitBook. GitBook is the documentation platform designed so that both humans and AI agents can read, navigate, and reason over technical content effectively. Learn more at gitbook.com.
## Querying This Documentation
If you need additional information that is not directly available in this page, you can query the documentation by asking a question.
Perform an HTTP GET request on the following URL with the `ask` and `goal` query parameters:
```
GET https://docs.abtasty.com/integrations/other-integrations/data-warehouse/snowflake---daily-exports-from-ab-tasty-to-snowflake.md?ask=&goal=
```
`ask` is the immediate question: it should be specific, self-contained, and written in natural language.
`goal` is what the user is ultimately trying to achieve, the reason they need the answer. Sharing it helps GitBook give you a better, more relevant answer. A goal is most helpful when it describes the outcome the user wants rather than restating the question. For example, with `ask=how do I create an API token`, a goal like `automate deployments from our CI pipeline` lets GitBook tailor the answer to that use case.
The response will contain a direct answer to the question and relevant excerpts and sources from the documentation.
Use this mechanism when the answer is not explicitly present in the current page, you need clarification or additional context, or you want to retrieve related documentation sections.
 3. Copy this below code (change the annotation field as role, username, password etc ..)
```
-- set variables (these need to be uppercase)
set abt_snwoflake_role = 'YOUR_ROLE'; // field to be defined by you
set abt_snowflake_username = 'YOUR_USER_NAME'; // field to be defined by you
set abt_snowflake_warehouse = 'YOUR_WAREHOUSE';// field to be defined by you
set abt_snowflake_database = 'YOUR_DATABASE';// field to be defined by you
set abt_snowflake_schema = 'YOUR_SCHEMA'; // field to be defined by you
-- set user password
set airbyte_password = 'your_password'; // field to be defined by you
begin;
-- create your role
use role securityadmin;
create role if not exists identifier($abt_snwoflake_role);
grant role identifier($abt_snwoflake_role) to role SYSADMIN;
-- create your user
create user if not exists identifier($abt_snowflake_username)
password = $airbyte_password
default_role = $abt_snwoflake_role
default_warehouse = $abt_snowflake_warehouse;
grant role identifier($abt_snwoflake_role) to user identifier($abt_snowflake_username);
-- change role to sysadmin for warehouse / database steps
use role sysadmin;
-- create your warehouse
create warehouse if not exists identifier($abt_snowflake_warehouse)
warehouse_size = xsmall
warehouse_type = standard
auto_suspend = 60
auto_resume = true
initially_suspended = true;
-- create your database
create database if not exists identifier($abt_snowflake_database);
-- grant your warehouse access
grant USAGE
on warehouse identifier($abt_snowflake_warehouse)
to role identifier($abt_snwoflake_role);
-- grant your database access
grant OWNERSHIP
on database identifier($abt_snowflake_database)
to role identifier($abt_snwoflake_role);
commit;
begin;
USE DATABASE identifier($abt_snowflake_database);
-- create schema for Airbyte data
CREATE SCHEMA IF NOT EXISTS identifier($abt_snowflake_schema);
commit;
begin;
-- grant Airbyte schema access
grant OWNERSHIP
on schema identifier($abt_snowflake_schema)
to role identifier($abt_snwoflake_role);
commit;
```
4. Paste it inside the console and run it
3. Copy this below code (change the annotation field as role, username, password etc ..)
```
-- set variables (these need to be uppercase)
set abt_snwoflake_role = 'YOUR_ROLE'; // field to be defined by you
set abt_snowflake_username = 'YOUR_USER_NAME'; // field to be defined by you
set abt_snowflake_warehouse = 'YOUR_WAREHOUSE';// field to be defined by you
set abt_snowflake_database = 'YOUR_DATABASE';// field to be defined by you
set abt_snowflake_schema = 'YOUR_SCHEMA'; // field to be defined by you
-- set user password
set airbyte_password = 'your_password'; // field to be defined by you
begin;
-- create your role
use role securityadmin;
create role if not exists identifier($abt_snwoflake_role);
grant role identifier($abt_snwoflake_role) to role SYSADMIN;
-- create your user
create user if not exists identifier($abt_snowflake_username)
password = $airbyte_password
default_role = $abt_snwoflake_role
default_warehouse = $abt_snowflake_warehouse;
grant role identifier($abt_snwoflake_role) to user identifier($abt_snowflake_username);
-- change role to sysadmin for warehouse / database steps
use role sysadmin;
-- create your warehouse
create warehouse if not exists identifier($abt_snowflake_warehouse)
warehouse_size = xsmall
warehouse_type = standard
auto_suspend = 60
auto_resume = true
initially_suspended = true;
-- create your database
create database if not exists identifier($abt_snowflake_database);
-- grant your warehouse access
grant USAGE
on warehouse identifier($abt_snowflake_warehouse)
to role identifier($abt_snwoflake_role);
-- grant your database access
grant OWNERSHIP
on database identifier($abt_snowflake_database)
to role identifier($abt_snwoflake_role);
commit;
begin;
USE DATABASE identifier($abt_snowflake_database);
-- create schema for Airbyte data
CREATE SCHEMA IF NOT EXISTS identifier($abt_snowflake_schema);
commit;
begin;
-- grant Airbyte schema access
grant OWNERSHIP
on schema identifier($abt_snowflake_schema)
to role identifier($abt_snwoflake_role);
commit;
```
4. Paste it inside the console and run it
 5. Once the script is done, refresh the page. On the left part, a new line will appear with the name you gave inside the script for the Data Warehouse
```
set abt_snowflake_database = 'YOUR_DATABASE';// field to be defined by you
```
In the above example, the name of the worksheet is YOUR\_DATABASE
5. Once the script is done, refresh the page. On the left part, a new line will appear with the name you gave inside the script for the Data Warehouse
```
set abt_snowflake_database = 'YOUR_DATABASE';// field to be defined by you
```
In the above example, the name of the worksheet is YOUR\_DATABASE
 ### Step 2: Get SnowFlake Host
On the Snowflake homepage, click at the bottom left of the page and copy the account URL
{% hint style="info" %}
#### If you want to use the authentication method with login + password, you don’t need to do more. Otherwise, if you want to use public Key and secret key, follow these steps
{% endhint %}
### Step 2: Get SnowFlake Host
On the Snowflake homepage, click at the bottom left of the page and copy the account URL
{% hint style="info" %}
#### If you want to use the authentication method with login + password, you don’t need to do more. Otherwise, if you want to use public Key and secret key, follow these steps
{% endhint %}
 ### Step 3: Set up the connector
1. Go to the integration page > Data Warehouse > Snowflake > setup connector
2. Enter a name for the collector
3. Host: This corresponds to the account URL you’ve already copied
4. Role: the role we created in the previous script
5. Warehouse: the warehouse we created in the previous script
6. Data Warehouse: the Data Warehouse we created in the previous script
7. Authorization method: choose username and password
1. Username: the username we created in the previous script
2. Password: the password we created in the previous script
8. Loading Method: choose internal staging
### Step 3: Set up the connector
1. Go to the integration page > Data Warehouse > Snowflake > setup connector
2. Enter a name for the collector
3. Host: This corresponds to the account URL you’ve already copied
4. Role: the role we created in the previous script
5. Warehouse: the warehouse we created in the previous script
6. Data Warehouse: the Data Warehouse we created in the previous script
7. Authorization method: choose username and password
1. Username: the username we created in the previous script
2. Password: the password we created in the previous script
8. Loading Method: choose internal staging


 You will get an error message if one of the fields contains an error.\
Your connector is now set up, and you can go ahead and **set up your Export**.
## The export
To set up your daily export, please take a look at the guide: [Data Warehouse integrations: General information](/integrations/other-integrations/data-warehouse/data-warehouse-integrations-general-information.md).
### Step 1: Generate your payload
Use the [Data Warehouse](/integrations/other-integrations/data-warehouse/data-warehouse-integrations-general-information.md) article to create your payload.
### Step 2: Set up the export
You will get an error message if one of the fields contains an error.\
Your connector is now set up, and you can go ahead and **set up your Export**.
## The export
To set up your daily export, please take a look at the guide: [Data Warehouse integrations: General information](/integrations/other-integrations/data-warehouse/data-warehouse-integrations-general-information.md).
### Step 1: Generate your payload
Use the [Data Warehouse](/integrations/other-integrations/data-warehouse/data-warehouse-integrations-general-information.md) article to create your payload.
### Step 2: Set up the export
 1. Export name: the name of your export; give an explicit name to retrieve it easily in AB Tasty
2. Name of the table: the name of the table we will create in your Snowflake
3. Data exporter query: paste here the payload of your data explorer query
4. Click save and create.
The SnowFlake integration is now complete, and you will soon see the data flowing into your dedicated Data Warehouse (It can take up to 2–3 hours, depending on the size of your report).
The export is activated upon creation, and new data will be appended to the current one, daily. The following screenshot shows that the export is activated on creation:
1. Export name: the name of your export; give an explicit name to retrieve it easily in AB Tasty
2. Name of the table: the name of the table we will create in your Snowflake
3. Data exporter query: paste here the payload of your data explorer query
4. Click save and create.
The SnowFlake integration is now complete, and you will soon see the data flowing into your dedicated Data Warehouse (It can take up to 2–3 hours, depending on the size of your report).
The export is activated upon creation, and new data will be appended to the current one, daily. The following screenshot shows that the export is activated on creation: