> For the complete documentation index, see [llms.txt](https://docs.abtasty.com/llms.txt). Markdown versions of documentation pages are available by appending `.md` to page URLs; this page is available as [Markdown](https://docs.abtasty.com/web-experimentation-and-personalization/editors-and-widget/visual-editor/how-to-create-trackers-in-the-editor.md).
# How to create trackers in the editor
It is important to add trackers in order to track how visitors respond to the changes you make on your website.
For example, if you change the color of a button, you’ll need to track the clicks on it.
 ## Add a tracker
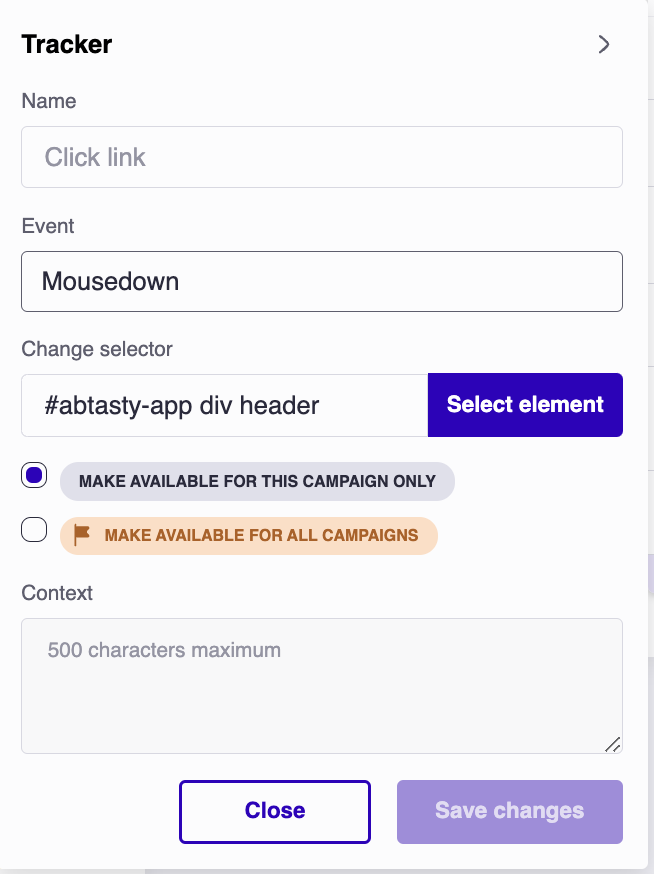
Select the element you want to track and click on Add Tracker.
* Name your tracker (e.g. click on CTA “Buy Now”)
* Event: Choose between the following options:
* **Mousedown**: tracked event based on the mouse clicking and releasing
* **Click**: tracked event based on the click only
* **Submit**: tracked event based on a form send
* **Focus**: visitor has set the focus on the targeted element
* **Blur**: visitor has left the targeted element (which had the focus)
* **Hover**: visitor has hovered over the element
*Note: In order to maintain good quality and a reasonable amount of data, the hover event is only triggered if the visitor remains at least 500ms above the targeted element.*
The selector you’ve chosen is preselected in the *change selector* field, but you can change it or refine it.
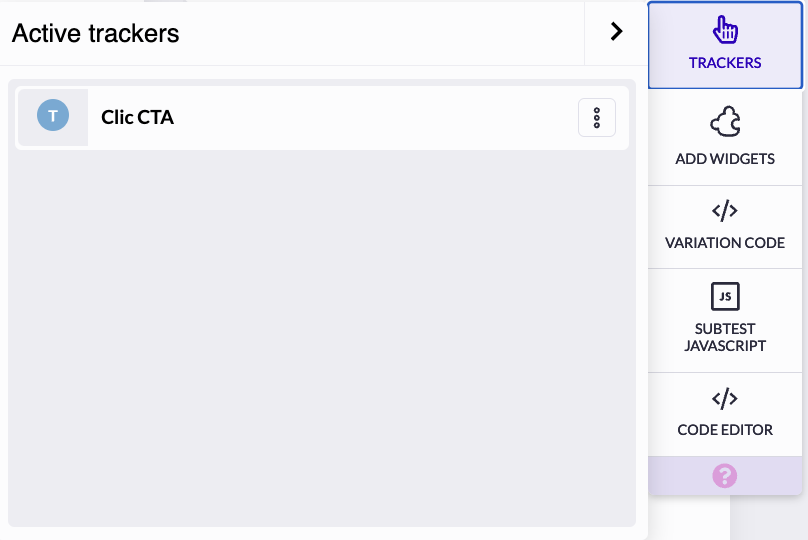
While editing, click on Validate - your tracker will be visible if you click on the Tracker entry on the right-hand bar. You can edit or remove trackers directly from this panel.
## Add a tracker
Select the element you want to track and click on Add Tracker.
* Name your tracker (e.g. click on CTA “Buy Now”)
* Event: Choose between the following options:
* **Mousedown**: tracked event based on the mouse clicking and releasing
* **Click**: tracked event based on the click only
* **Submit**: tracked event based on a form send
* **Focus**: visitor has set the focus on the targeted element
* **Blur**: visitor has left the targeted element (which had the focus)
* **Hover**: visitor has hovered over the element
*Note: In order to maintain good quality and a reasonable amount of data, the hover event is only triggered if the visitor remains at least 500ms above the targeted element.*
The selector you’ve chosen is preselected in the *change selector* field, but you can change it or refine it.
While editing, click on Validate - your tracker will be visible if you click on the Tracker entry on the right-hand bar. You can edit or remove trackers directly from this panel.
 {% hint style="warning" %}
**Creation order has an impact**
The order in which you configure your trackers in the visual editor is important, as they will automatically be added to the Goal step of your campaign (Step 3).
It enables you to pre-define your campaign goals so that none of the configured trackers are forgotten.
The first tracker you configure in the visual editor will be set as a **primary goal for your campaign**, and all other trackers you configure will be set as secondary goals.
This concern trackers created manually using a CSS selector as well as the widget trackers:
* [Dwell time tracking widget](/web-experimentation-and-personalization/editors-and-widget/list-of-widgets/ab-tasty-prebuilt-widgets/dwell-time-tracking-widget.md)
* [Element visible tracking widget](/web-experimentation-and-personalization/editors-and-widget/list-of-widgets/ab-tasty-prebuilt-widgets/element-visible-tracking-widget.md)
* [Iframe click tracking widget](/web-experimentation-and-personalization/editors-and-widget/list-of-widgets/ab-tasty-prebuilt-widgets/iframe-widget.md)
* [Scroll rate tracking widget](/web-experimentation-and-personalization/editors-and-widget/list-of-widgets/ab-tasty-prebuilt-widgets/scroll-rate-tracking-widget.md)
From the Goal step, you will then be able to reorder these automatically set up goals.
{% endhint %}
## Trackers availability
Two options are available in the tracker configuration:
* **Make available for this campaign only:** for specific trackers linked to this particular campaign. we are talking about [X action trackers](/web-experimentation-and-personalization/editors-and-widget/visual-editor/how-to-create-an-action-tracker-in-the-editor.md).
* **Make available for all campaigns:** for commun trackers you'll need to reuse in other campaigns. If you choose this option, the tracker will be recorded at the account level and you'll retrieve it in your [goal management page](/assets-library/trackers-page.md) such as in the [goals step in the campaign flow](/web-experimentation-and-personalization/campaign-flow-goals-step.md). We are talking about [Account action trackers](/assets-library/trackers-page/action-trackers/how-to-create-and-manage-action-trackers.md).
For more information about trackers (Account action trackers and X action trackers), please refer to the following [article](/assets-library/trackers-page/action-trackers/how-to-create-and-manage-action-trackers.md).
---
# Agent Instructions
This documentation is published with GitBook. GitBook is the documentation platform designed so that both humans and AI agents can read, navigate, and reason over technical content effectively. Learn more at gitbook.com.
## Querying This Documentation
If you need additional information that is not directly available in this page, you can query the documentation dynamically by asking a question.
Perform an HTTP GET request on the current page URL with the `ask` query parameter, and the optional `goal` query parameter:
```
GET https://docs.abtasty.com/web-experimentation-and-personalization/editors-and-widget/visual-editor/how-to-create-trackers-in-the-editor.md?ask=&goal=
```
`ask` is the immediate question: it should be specific, self-contained, and written in natural language.
`goal` is optional and describes the broader end goal you are ultimately trying to accomplish on behalf of the user. GitBook uses it to tailor the answer towards what is most useful for that goal.
The response will contain a direct answer to the question and relevant excerpts and sources from the documentation.
Use this mechanism when the answer is not explicitly present in the current page, you need clarification or additional context, or you want to retrieve related documentation sections.
{% hint style="warning" %}
**Creation order has an impact**
The order in which you configure your trackers in the visual editor is important, as they will automatically be added to the Goal step of your campaign (Step 3).
It enables you to pre-define your campaign goals so that none of the configured trackers are forgotten.
The first tracker you configure in the visual editor will be set as a **primary goal for your campaign**, and all other trackers you configure will be set as secondary goals.
This concern trackers created manually using a CSS selector as well as the widget trackers:
* [Dwell time tracking widget](/web-experimentation-and-personalization/editors-and-widget/list-of-widgets/ab-tasty-prebuilt-widgets/dwell-time-tracking-widget.md)
* [Element visible tracking widget](/web-experimentation-and-personalization/editors-and-widget/list-of-widgets/ab-tasty-prebuilt-widgets/element-visible-tracking-widget.md)
* [Iframe click tracking widget](/web-experimentation-and-personalization/editors-and-widget/list-of-widgets/ab-tasty-prebuilt-widgets/iframe-widget.md)
* [Scroll rate tracking widget](/web-experimentation-and-personalization/editors-and-widget/list-of-widgets/ab-tasty-prebuilt-widgets/scroll-rate-tracking-widget.md)
From the Goal step, you will then be able to reorder these automatically set up goals.
{% endhint %}
## Trackers availability
Two options are available in the tracker configuration:
* **Make available for this campaign only:** for specific trackers linked to this particular campaign. we are talking about [X action trackers](/web-experimentation-and-personalization/editors-and-widget/visual-editor/how-to-create-an-action-tracker-in-the-editor.md).
* **Make available for all campaigns:** for commun trackers you'll need to reuse in other campaigns. If you choose this option, the tracker will be recorded at the account level and you'll retrieve it in your [goal management page](/assets-library/trackers-page.md) such as in the [goals step in the campaign flow](/web-experimentation-and-personalization/campaign-flow-goals-step.md). We are talking about [Account action trackers](/assets-library/trackers-page/action-trackers/how-to-create-and-manage-action-trackers.md).
For more information about trackers (Account action trackers and X action trackers), please refer to the following [article](/assets-library/trackers-page/action-trackers/how-to-create-and-manage-action-trackers.md).
---
# Agent Instructions
This documentation is published with GitBook. GitBook is the documentation platform designed so that both humans and AI agents can read, navigate, and reason over technical content effectively. Learn more at gitbook.com.
## Querying This Documentation
If you need additional information that is not directly available in this page, you can query the documentation dynamically by asking a question.
Perform an HTTP GET request on the current page URL with the `ask` query parameter, and the optional `goal` query parameter:
```
GET https://docs.abtasty.com/web-experimentation-and-personalization/editors-and-widget/visual-editor/how-to-create-trackers-in-the-editor.md?ask=&goal=
```
`ask` is the immediate question: it should be specific, self-contained, and written in natural language.
`goal` is optional and describes the broader end goal you are ultimately trying to accomplish on behalf of the user. GitBook uses it to tailor the answer towards what is most useful for that goal.
The response will contain a direct answer to the question and relevant excerpts and sources from the documentation.
Use this mechanism when the answer is not explicitly present in the current page, you need clarification or additional context, or you want to retrieve related documentation sections.